
Need help getting a handle on your finances, or want some budget organization ideas? Using a budget binder is a great way to help you stay on top of your finances and save more money. Find out how to use a Personal Finance Binder to help you stay organized with your finances.
Before we get started, be sure to get your Personal Finance Binder HERE.
Jump Ahead To:
Why You Should Have A Budget Binder
Finding the right budgeting method can be tough. I currently use Excel spreadsheets (I love the calculators, charts, and graphs), but I felt that I also needed a “paper component” to keep everything organized. Therefore, I put together a printable budget planner to use in conjunction with my spreadsheets. It’s called the Personal Finance Binder.
A budget binder or a monthly budget planner is how you can keep all of your important financial documents together and organized. When you have all your financial documents in one place, it makes it easy for you to keep track of everything.
You certainly don’t have to use the Personal Finance Binder with an Excel spreadsheet like I do. So I’m going to walk you through my process and also show you how you can use the Personal Finance Binder standing alone.
How I Organize My Personal Finance Binder
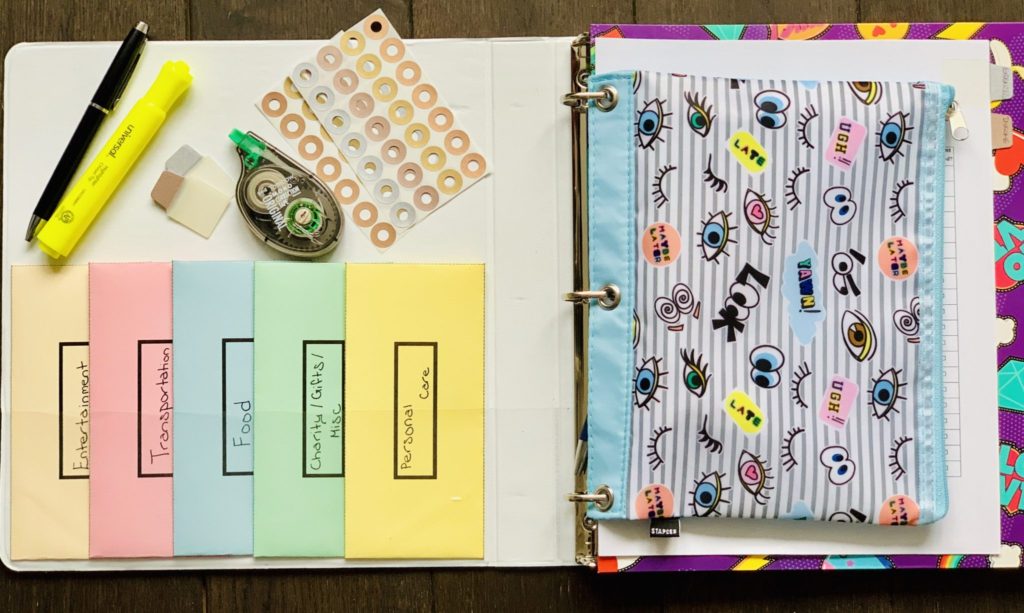
In the front of my budget binder, I have my stuffed cash envelopes and a pencil pouch. My pencil pouch is where I keep things such as pens, pencils, whiteout, erasers, sticky tabs, hole reinforcements, highlighters, checkbook, stamps, and address labels.
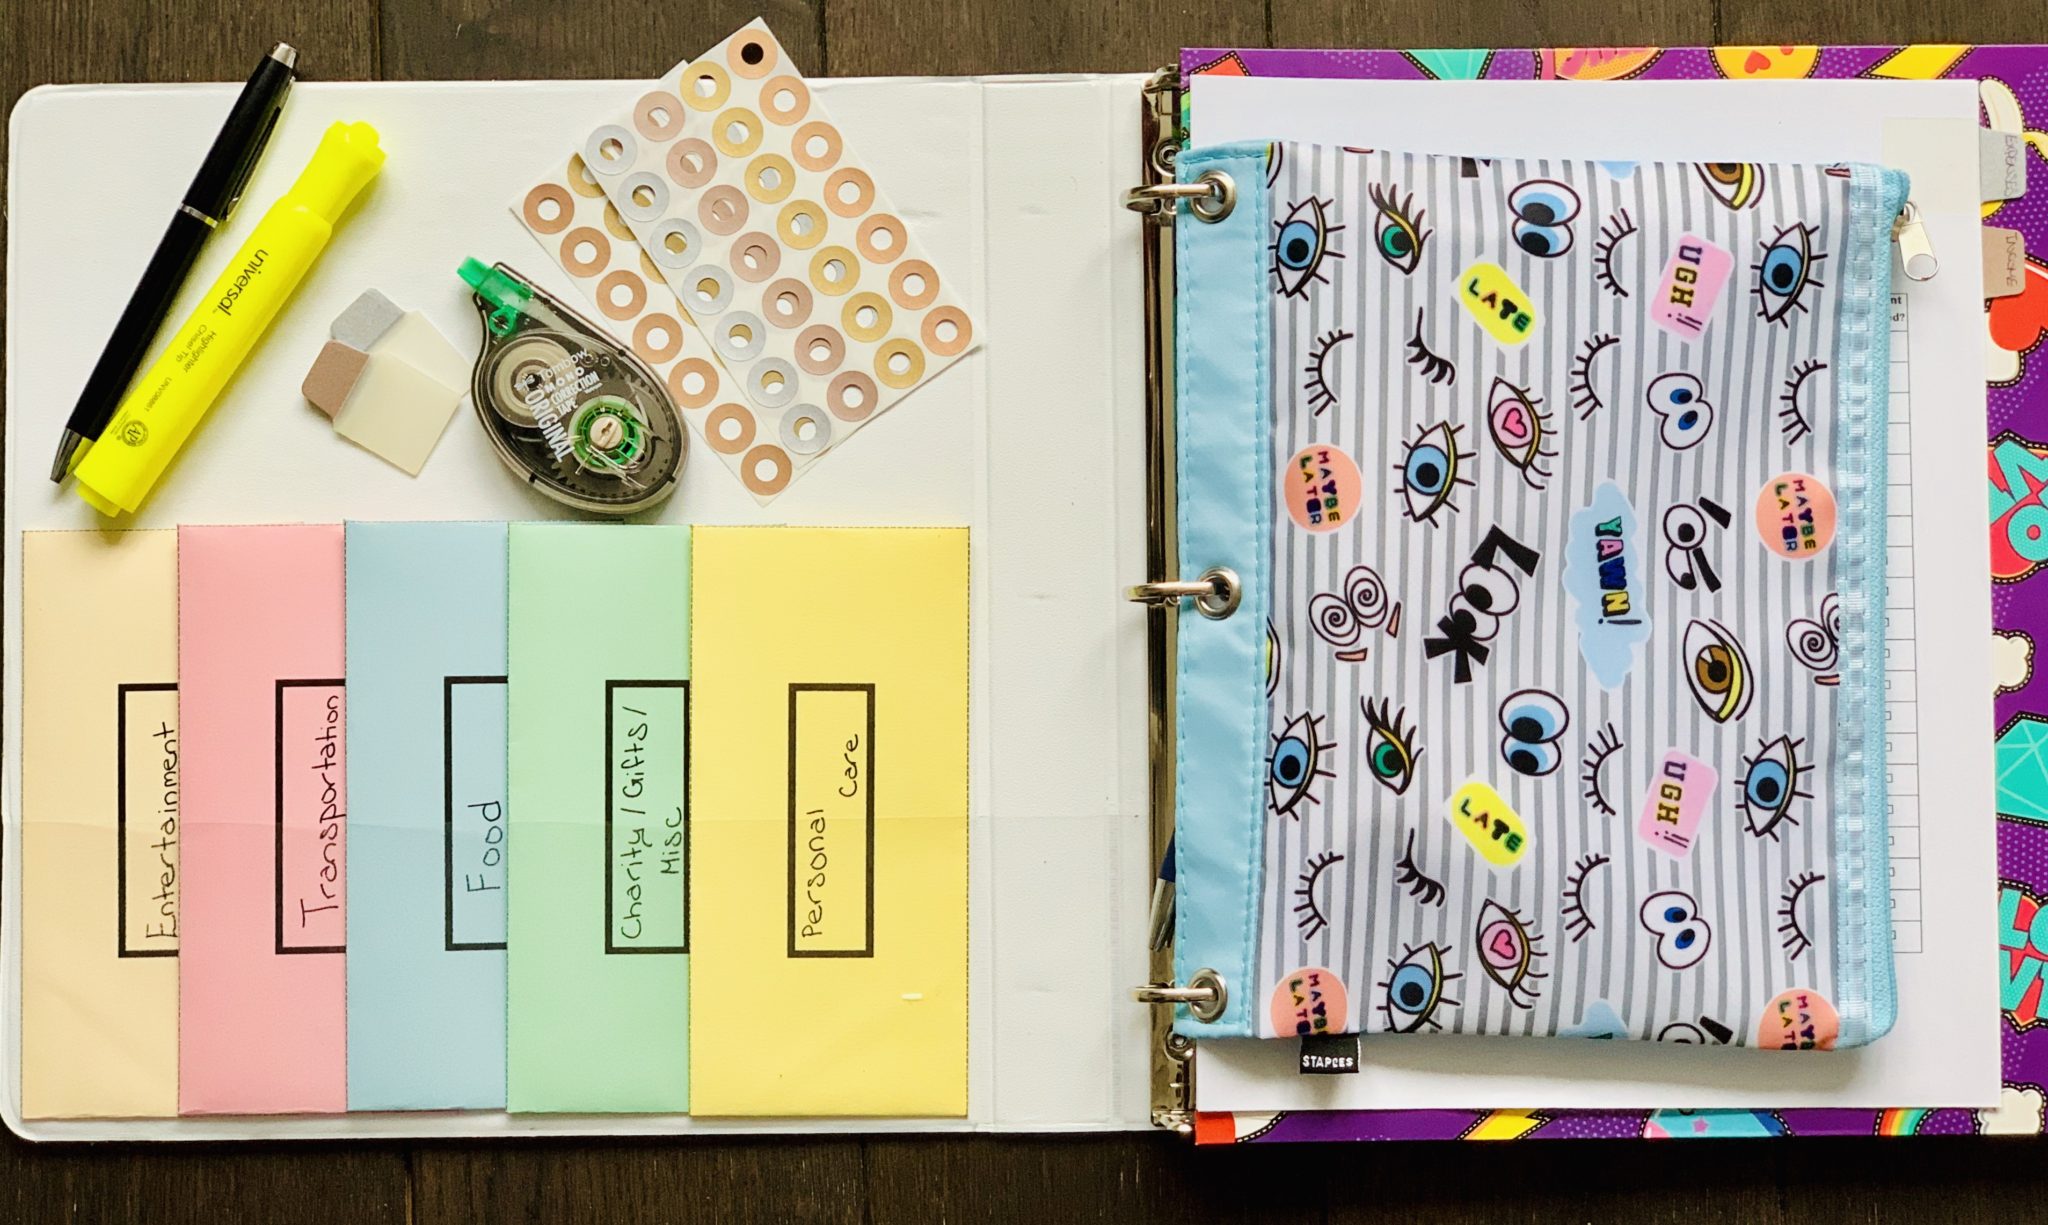
Next, in my printable budget planner, I have my folder to hold my receipts, statements, or bills. For example, I use my folder to store receipts if I don’t have time to log them right away in my Daily Expense Tracker; statements until I’m ready to file them; and store my bills until I’m ready to pay them.
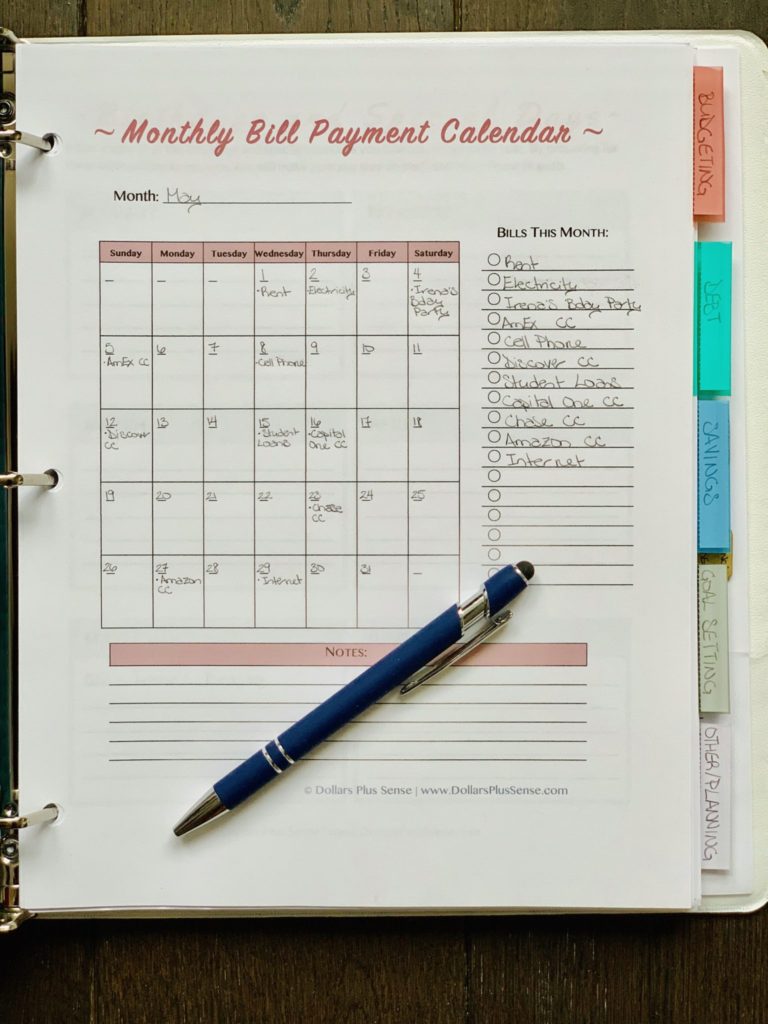
After my folder, I like to keep my calendars as the first thing I see before I get into my other sections. The first printable I have is my Monthly Bill Payment Calendar. This allows me to see all my bills coming up for the month at a glance.
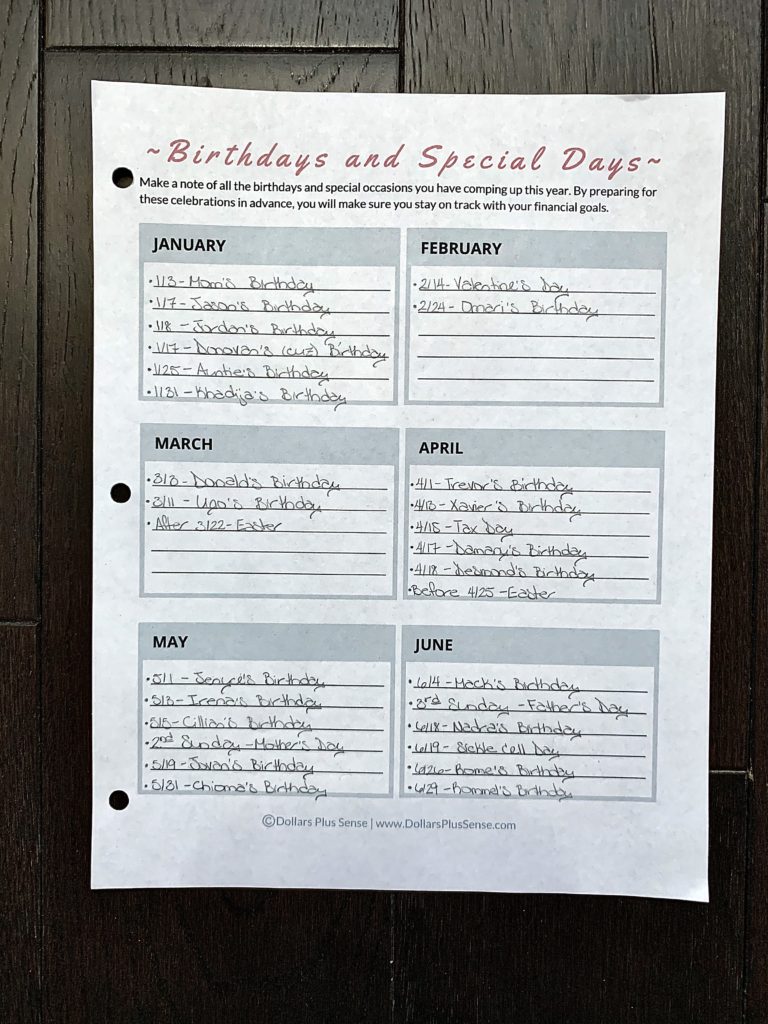
Next, I keep the Birthdays and Special Days tracker, so I can plug in those dates easily when I replace my Monthly Bill Payment Calendar every month.
Lastly, I have my weekly and daily planner to make sure I’m taking action steps towards my financial goals every day.
After those printables, I’ve divided my Personal Finance Binder into 5 sections. My section breakdown is as follows:
- Goal Setting
- Budgeting
- Debt
- Savings
- Other/Planning
You can also divide your budget binder by month as another option.
If this is your first time setting up a Personal Finance Binder, you may be asking yourself, “Where should I begin?” I recommend you start with setting some financial goals.
Section 1: Goal Setting
This section of my budget binder is where I focus on all my financial goals. It is important to set financial goals and track your progress regularly.
You must make goals and prioritize them if you want to eventually be financially free. People who identify their goals and work towards them usually accomplish their goals, and accomplish them quicker.
Therefore, I keep the following printables in this section (in this order) of my budget binder:
- Money Mindset Worksheet
- Financial Goals Worksheet
- Yearly Financial Goals
- Monthly Financial Goals
- Monthly Habit Tracker
- Weekly Financial Goals
- Monthly Financial Goals Reflection
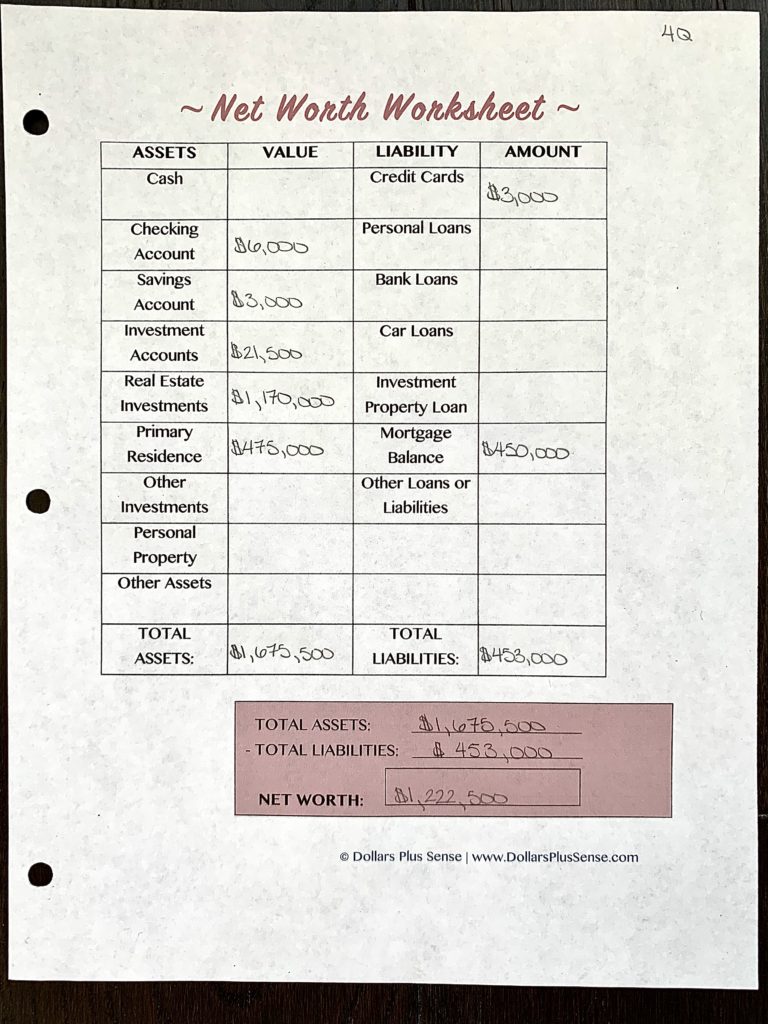
- Net Worth Worksheet
- Yearly Financial Goals Reflection
Before starting any financial journey, it’s important to change your money mindset. You cannot approach your financial journey with a scarcity mindset or limiting beliefs.
When you think of money, you should say to yourself “there’s more where that came from” instead of always thinking “I can’t afford it.” So the Money Mindset Worksheet will help you get rid of any limiting beliefs you may have.
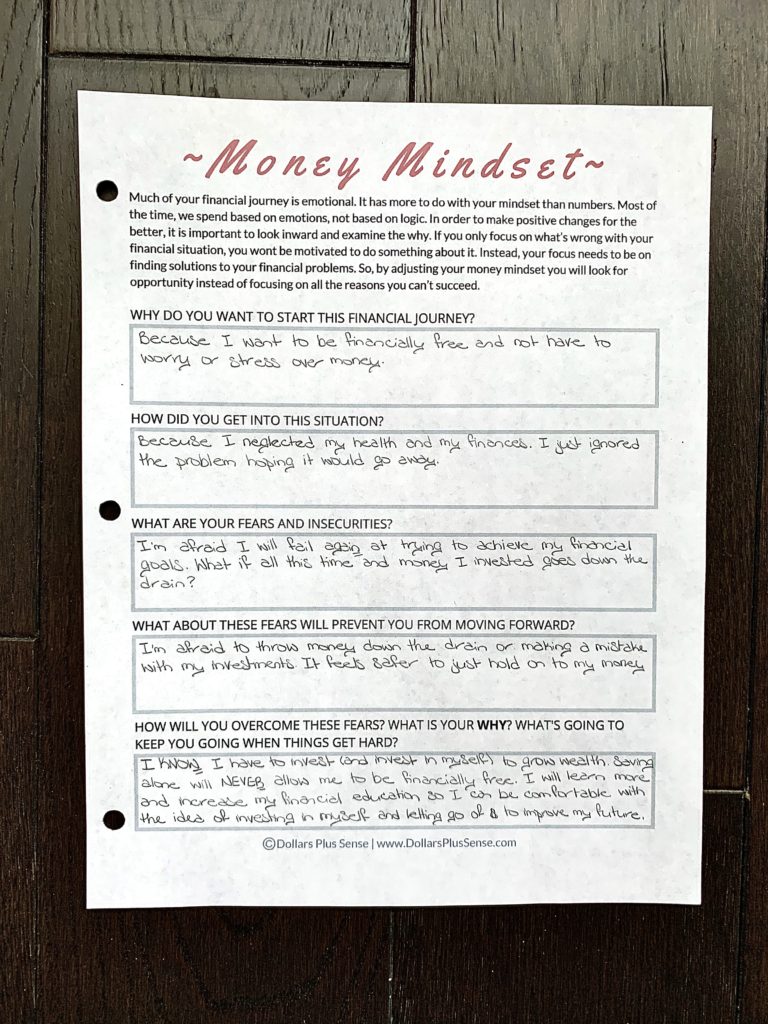
After filling out my Money Mindset Worksheet, I normally feel empowered to achieve my financial goals.
Next, I fill out my Financial Goals Worksheet and break that down into 3 BIG goals I will achieve this year.
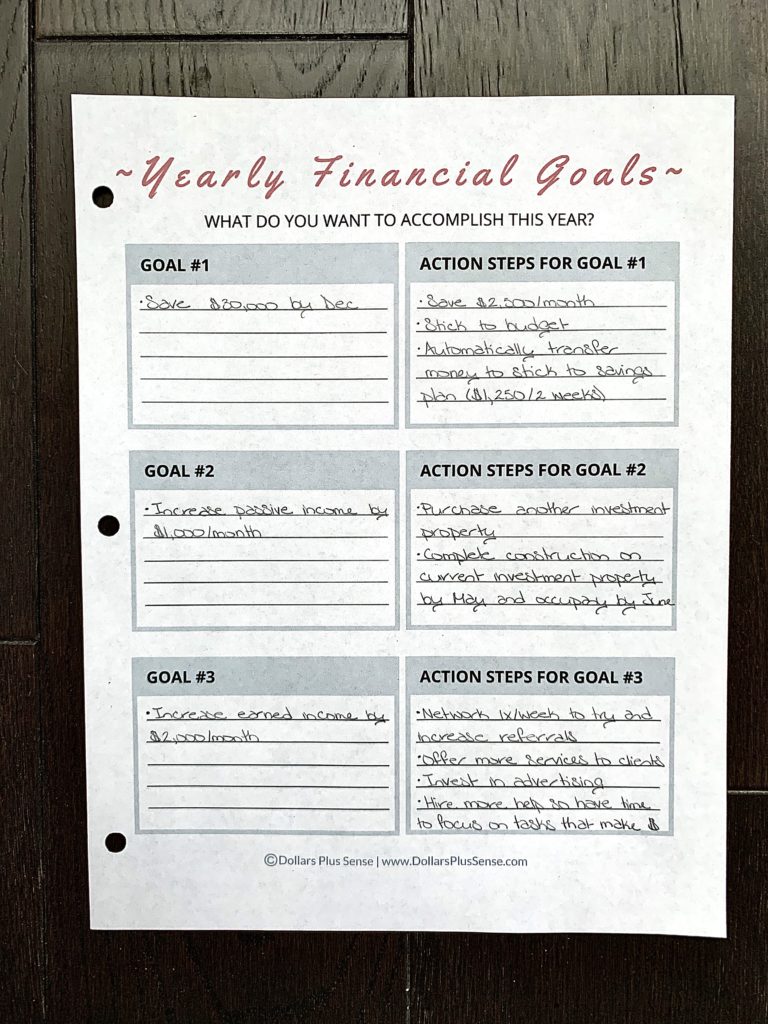
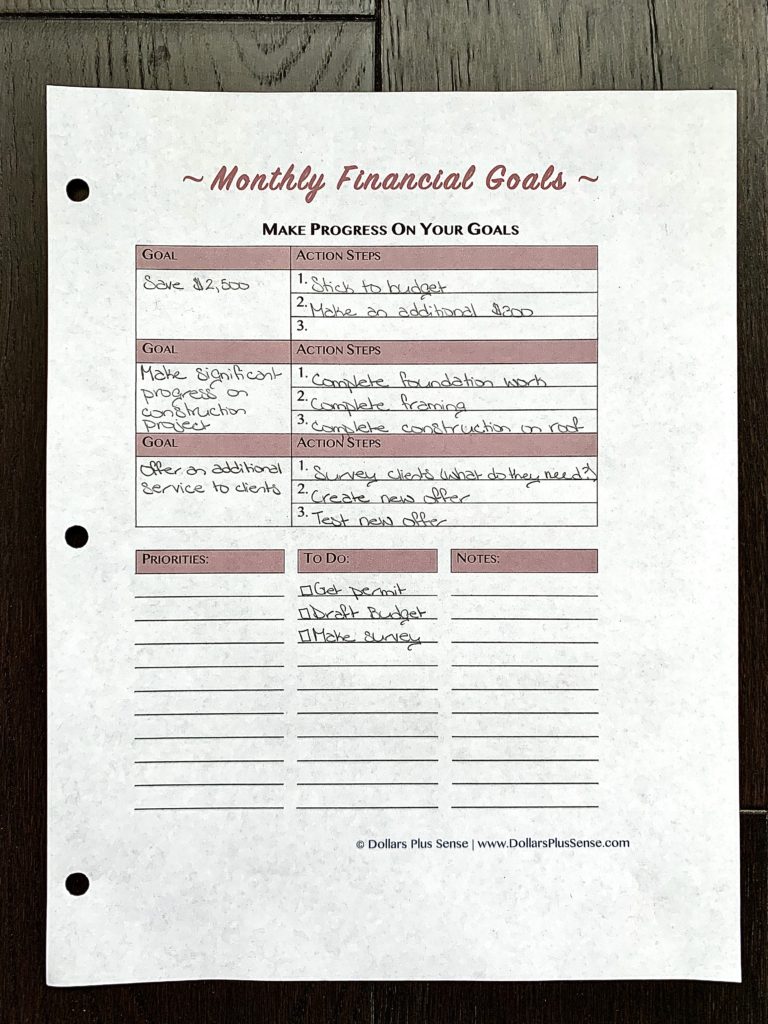
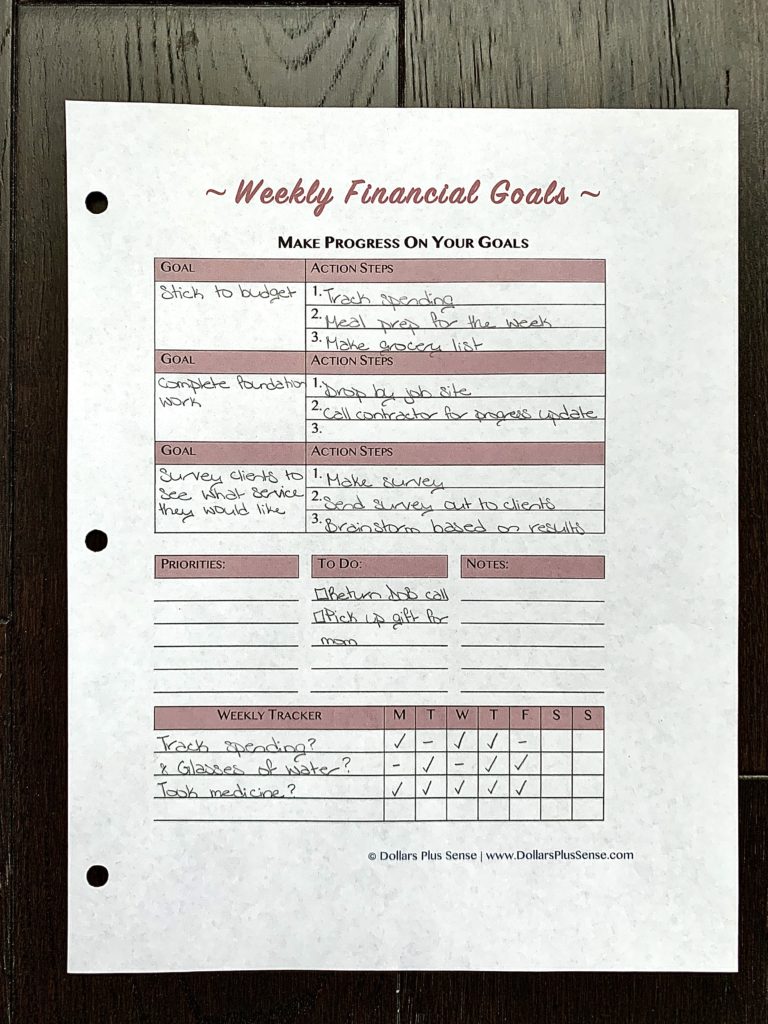
I then break my yearly goals into monthly and weekly goals so I know what action steps I need to take.
After I make my financial goals, I like to calculate my net worth every quarter and go over my financial goals every month. This helps me to see if I’m still on track to achieve my goals. If not, I know I need to make some adjustments.
Section 2: Budgeting
Once you have your financial goals set up, the next logical step is to set up a budget. Therefore, the second section of my Personal Finance Binder is budgeting.
In this section of my budget binder, I keep the following printables (in this order):
- Income Tracker
- Daily Expense Tracker
- Budgeting Categories List
- Monthly Budget (filled and unfilled)
- Paycheck Budget
- Annual Expense Tracker (filled and unfilled)
- Annual Bill Payment Checklist
- Upcoming Expenses
- Automatic Bill Pay Tracker
- Bill Payment Tracker
- Cash Envelope Overview
- Cash Envelopes Templates and Tracker Inserts
Of course, I don’t use every printable in this section every month, but I keep these printables grouped together in the same section of my monthly budget planner anyway. For example, I may choose not to use the Monthly Budget and use the Paycheck Budget instead.
I also like to keep my Daily Expense and Income Trackers in the front of this section so it’s easy to find. Since this is a printable I would use almost every day, I want it to be easily accessible.
Finally, every month I print out a fresh budget printable to replace the one I used last month in my budget binder.
If this is your first time trying to create a budget, follow these 5 simple steps to make a budget that WORKS:
- Determine your net income (take-home pay)
- Determine your monthly expenses
- Determine how much you want to allocate to each spending category
- Track and review your spending
- Make adjustments where necessary.
5 Simple Steps To Making A Budget That Works
1. Determine Your Net Income
If you have earned income from an employer where taxes are automatically taken out, it should be fairly easy for you to determine your take-home pay.
However, if you are self-employed, have irregular income or other outside sources of income you can use two methods to determine your take-home pay:
- If you have a record of your income for the past 12 months, you can take the average of all your monthly income for the past 12 months. Or if you like to be conservative, use the number from the month you earned your lowest income.
- If you don’t have a long income history, use the income you made from the previous month to determine your take-home pay for this month.
Whatever method you use, be sure to subtract obligations like taxes and business expenses to determine your take-home pay.
2. Determine Your Monthly Expenses
To help you determine your monthly expenses, you should start by writing down a list of all your expected expenses for the month. If you are not sure what your expected expenses are, begin by looking at what areas you spent money on in the past three months.
This is the most critical step in your budgeting process. Reviewing your past spending not only allows you to make your budget realistic but also gives you the numbers you need to use within your budget.
You can find this information by reviewing your past credit card and bank statements, or a third-party website like Empower. I like using Empower because it’s a FREE wealth management tool, and once you set it up, you can see all of your spending in one place (instead of having to log into multiple websites).
Also, if you sign up today and link at least one of your investment accounts (with a balance of more than $1,000), we’ll each get $50. That’s FREE money for keeping track and staying on top of your finances (something you should be doing anyway)!
The Personal Finance Binder comes with a Budget Categories Checklist of over 80 budget subcategories to make sure you include everything in your budget.
Print out the last three months of bank statements and use this checklist to start categorizing your spending.
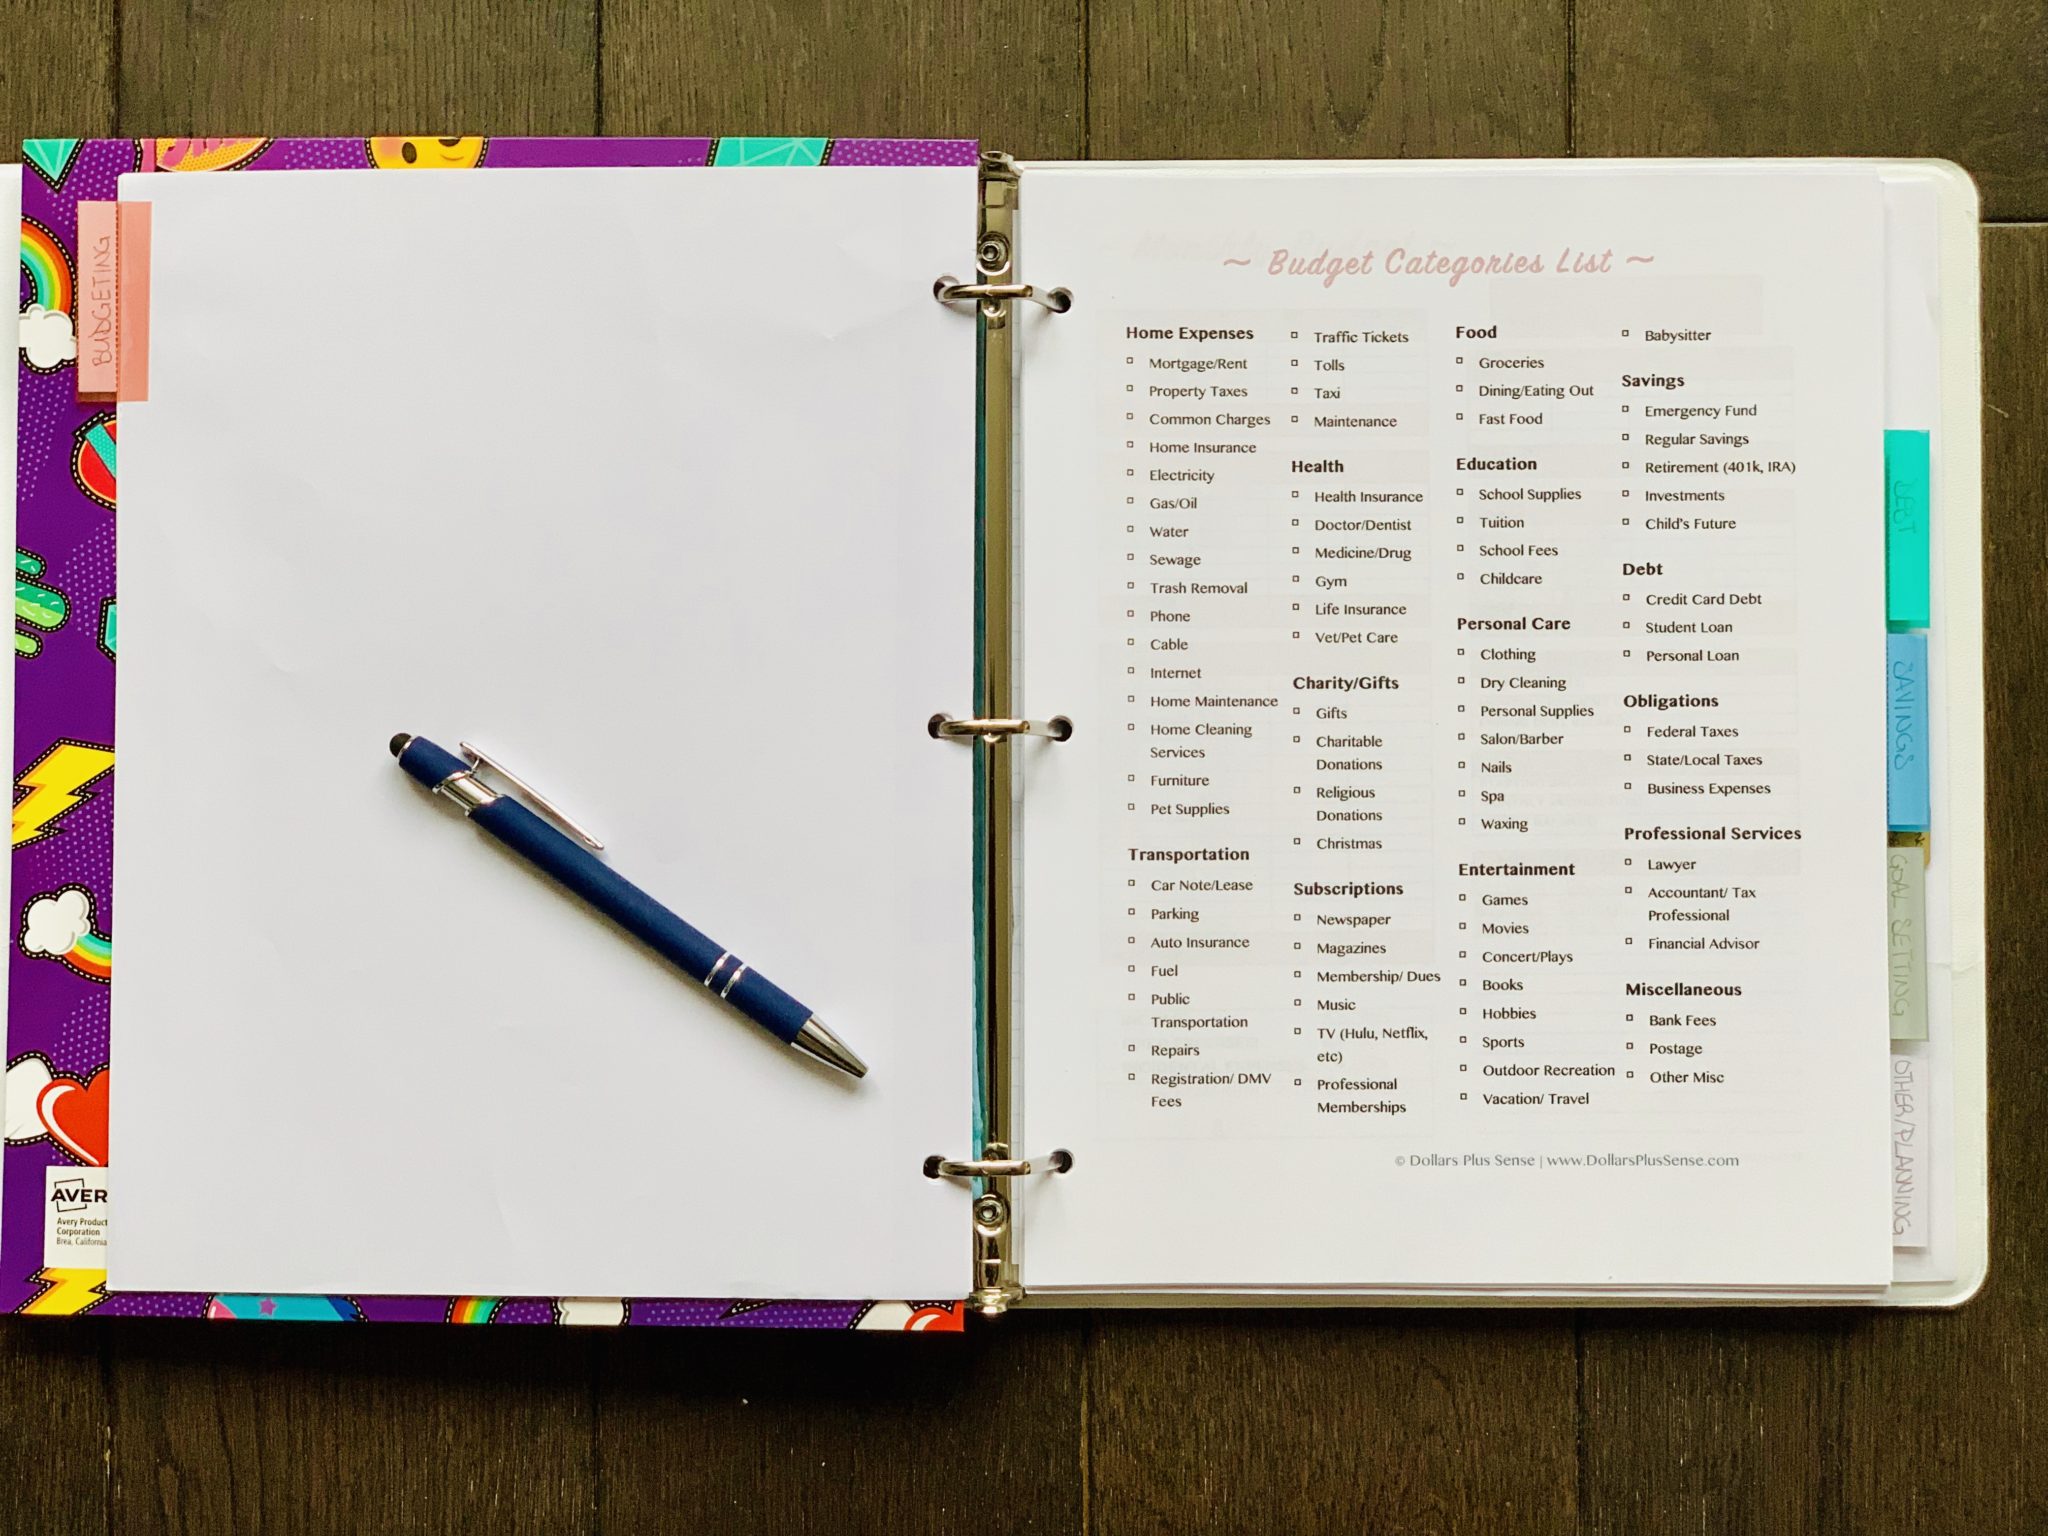
A lot of people often go wrong when making a budget because they accidentally leave out categories that will require money at some point. That can throw your whole budget off.
This checklist is designed to cover as many personal budget categories as possible. Don’t get overwhelmed by this list, because not every category will apply to you. Go through the checklist, and put a check next to each item you spend money on. Then include those categories in your budget.
Once you make your list, start writing how much you normally spend in that area. Unfortunately, you will not be able to account for the areas where you spent cash. However, it will provide you with a rough outline of your spending.
If there are any spending categories that you can’t figure out how much you spent, just take a guess of what you think you spend. Make sure to include a “miscellaneous” category as a catch-all for any expenses you may have forgotten to list.
3. Determine How Much To Spend In Each Category
After establishing your monthly income and what you actually spent in the past, look to see if the end result shows more income than expenses. If your expense column is more than your take-home pay, you need to figure out what areas you can cut back on spending.
Look to see if your spending in each budget category is reasonable. To determine if your spending is reasonable, start by looking at what the national average is.
For example, if the national average for food and dining out is 10% of your income, and you’re spending 20% of your income, then this may be an area to consider cutting back.
You can read my article “How Much Should I Be Spending?” to get a general idea of how much of your income you should allocate to each spending category.
4. Track and Review Your Spending
It is important to review your budget on a regular basis to make sure you are staying on track. The Personal Finance Binder comes with a Daily Expense Tracker to help you with that.
If you track your spending every day, you should write down what you spend as you go. Make a note in your phone or on a small piece of paper as you spend throughout the day. Then write the numbers in your expense tracker at the end of the day.
If you decide to track your spending every week instead, you can go online to your credit card, bank’s website, or use a third-party website like Empower to see your spending for the week.
You can then write down those transactions into your Daily Expense Tracker. Remember to also keep track of any cash you may have spent since this will not be on your bank statements.
I personally recommend recording your spending every day, or at the very least, once a week. Print out multiple sheets (one for each spending category or sub-category) and keep them in your binder.
If the hardest part of budgeting for you is tracking your spending, I highly recommend you sign up for Empower to help you.
Once you have recorded your spending for the month, plug-in the numbers from your Daily Expense Tracker (or whatever other method you use to track your spending) into your Monthly Budget or Paycheck Budget found in your Personal Finance Binder.
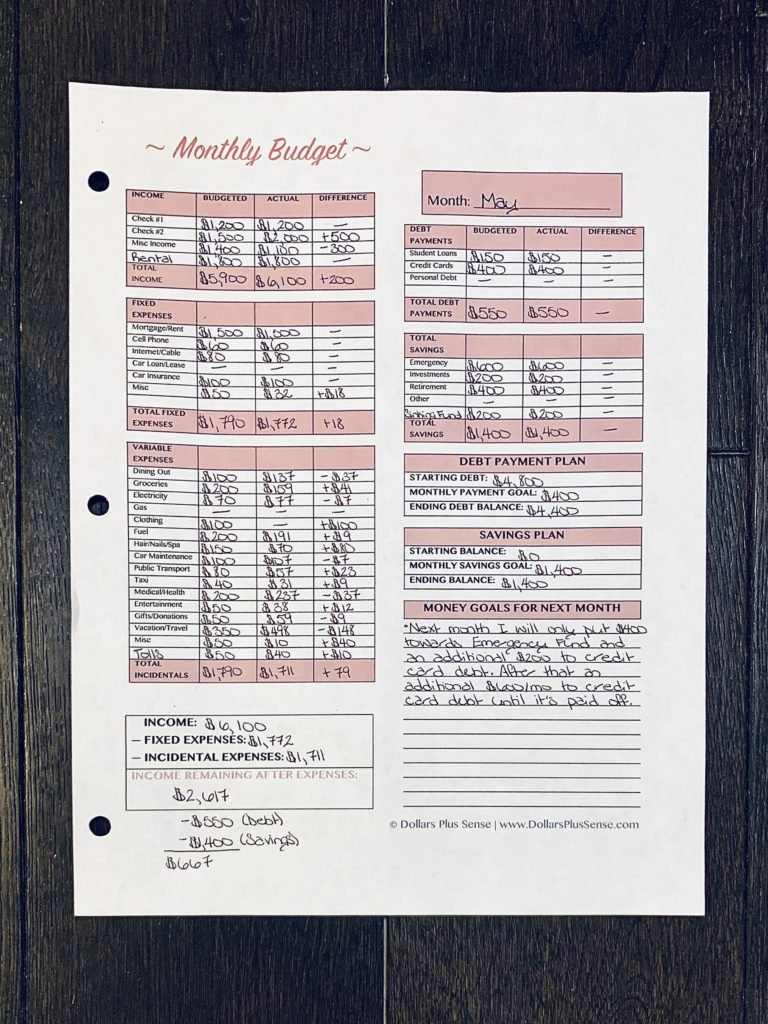
Take a minute to sit down and compare the actual expenses versus what you had in your budget. This will show you where you did well and where you may need to improve. You should not let a month pass without reviewing your budget.
Remember, you’re not going to get your budget perfect the first time and you will have to make adjustments to find a perfect system for you.
5. Make Adjustments Where Necessary
Having documented your income and spending, see where you may be falling short and make the necessary adjustments. Are you saving enough money? Are there any areas where you can cut back?
If you spend more than you budgeted in a particular area, figure out why you spent more. Maybe your budget in that particular area is not realistic and you need to make adjustments, or maybe you need to figure out ways to cut your expenses in that area.
If you find that you regularly go over your budget, I would try using the cash envelope method to help control your spending. The Personal Finance Binder comes with Cash Envelopes Templates and Trackers, and a Cash Envelope Overview Worksheet.
Use your Cash Envelopes for an entire month and see if that helps with your overspending.
- Related Article: How To Use The Cash Envelope Method
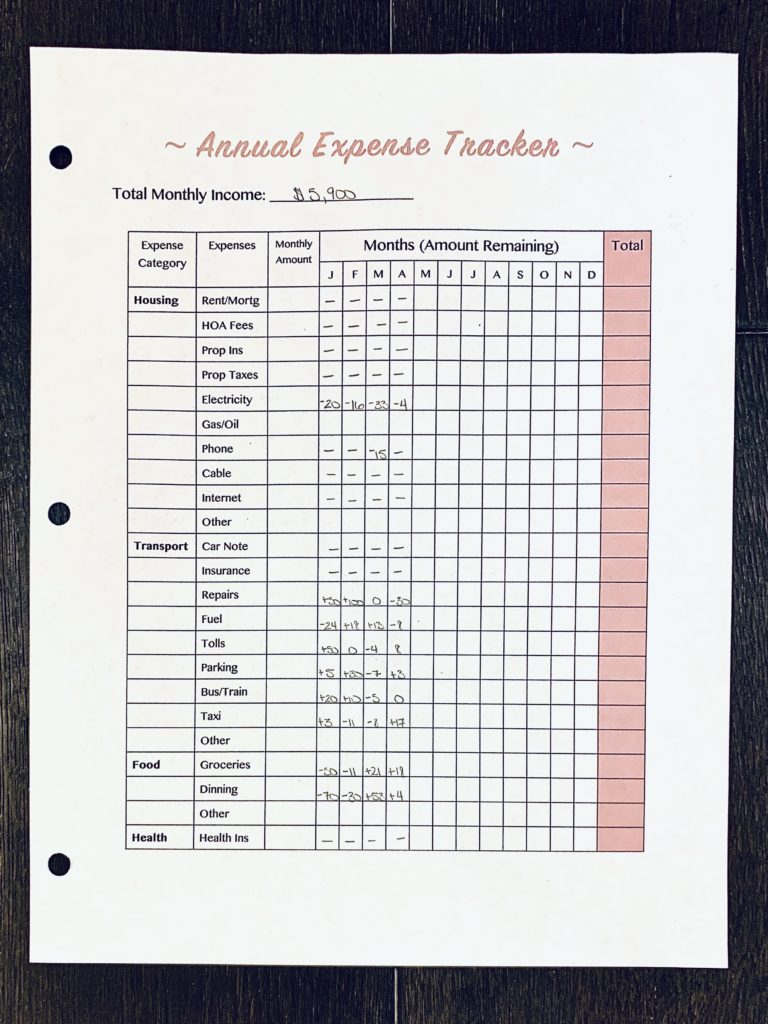
Finally, at the end of each month, fill out the Annual Expense Tracker to compare how you did from month to month.
For example, if you overspent on dining out in January, you can see if you made up the difference by spending less in February or March.
- Related Article: 3 Easy Ways To Drastically Cut Housing Expenses And Save Money
Section 3: Debt
The next section is where I keep track of my debt. In this section, I keep the following printables:
- Debt Worksheet
- Debt Avalanche/Snowball Worksheet
- Debt Payoff Tracker
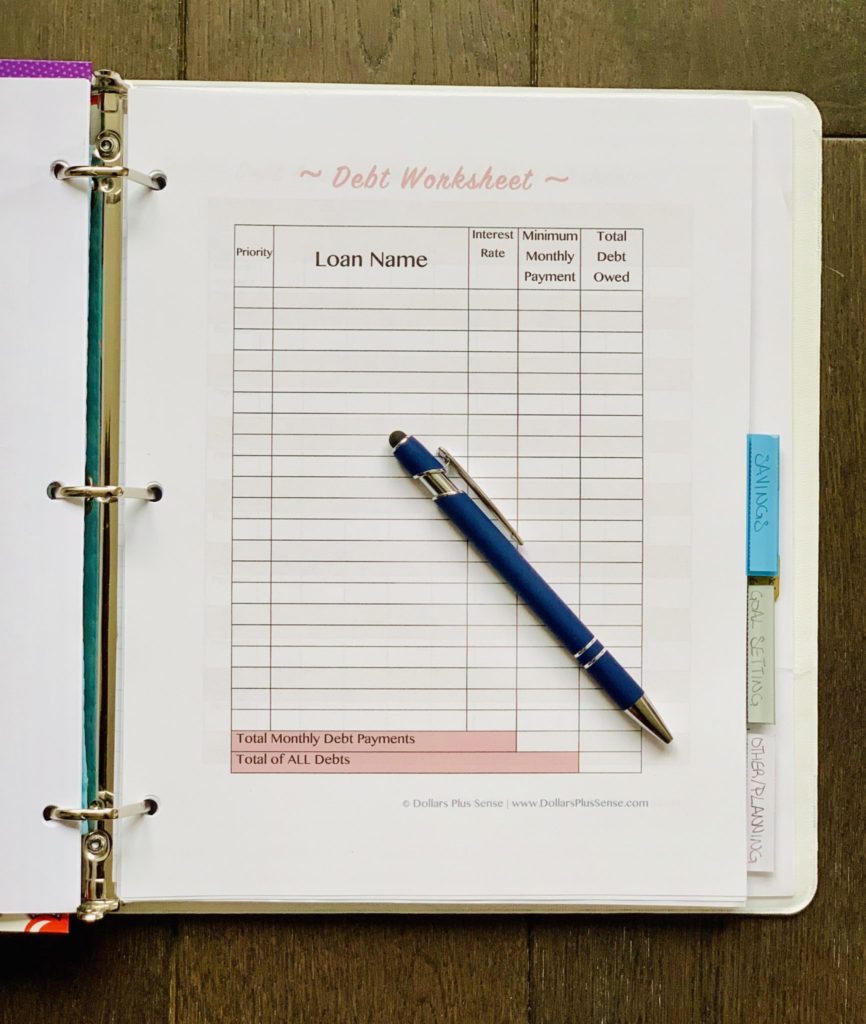
This section is where I make a debt repayment plan, and keep track of my debt payment. When using the Debt Worksheet, follow these steps:
- List out all of your current debts with their interest rate, minimum payment, and total balance owed.
- Figure out which debts you want to pay off first using the Debt Worksheet found in your Personal Finance Binder. For me, I’m using the Debt Avalanche Method, which means I’m paying off my debt with the highest interest rate first.
- Once you figure out which debts you want to pay off first, use the Debt Avalanche/Snowball Worksheet to keep track of your progress as you pay down your debt.
Finally, the Debt Payoff Tracker is a nice visual that makes it easy for you to see your progress and motivates you to keep going.
Section 4: Savings
This section of my budget binder is where I focus on my savings goals. I keep the following printables:
- Automatic Savings Tracker
- Savings Tracker
- Savings/Debt Thermometer
- Sinking Fund Worksheet
- 31-Day Money Savings Challenge
- 52-Week Money Savings Challenge
- No Spend Challenge Calendar
- Stock Investments Tracker
These printables make it very easy for me to keep track of all my savings goals.
First, start with the Sinking Fund Worksheet. This will help you map out all the savings goals you have and how much you need to save for that goal.
For example, in 2019 I had a major birthday trip and party I wanted to save for. I also like to prepare for Christmas and any other holidays or events in advance. So, here’s a look at what my Sinking Fund Worksheet looked like last year so I could properly prepare for these expenses:
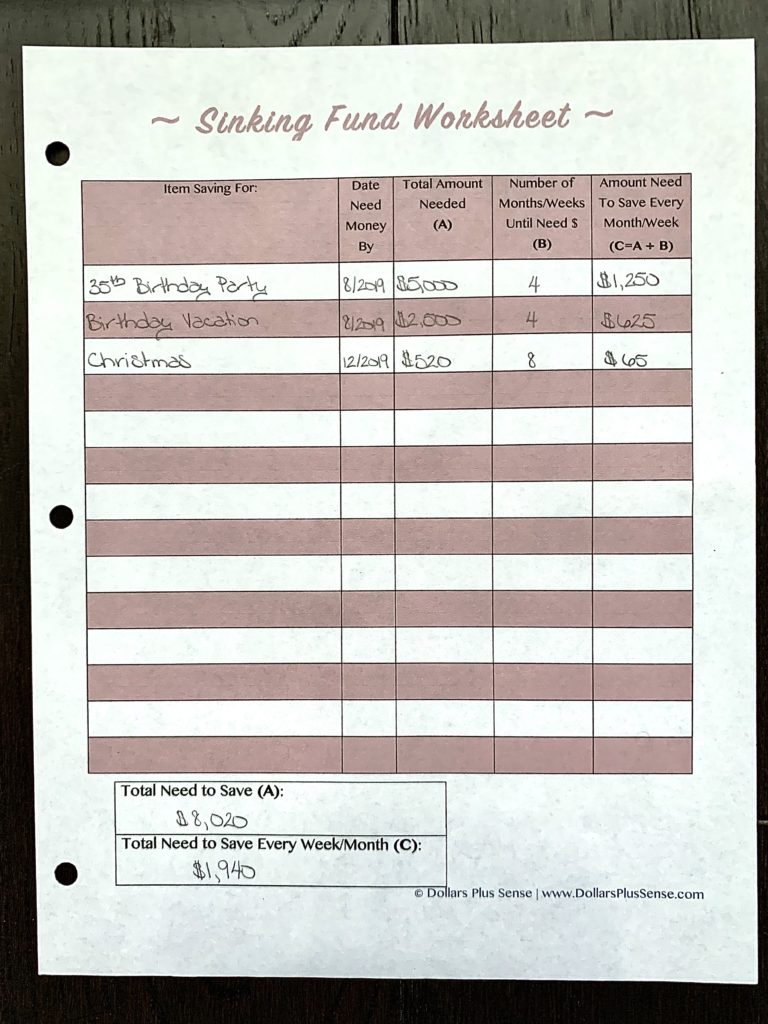
Knowing how much you need to save to cover all your expenses for the new year, you will be prepared with cash, and won’t dig yourself into an even deeper hole of debt.
- Related Article: What Is A Sinking Fund And Why You Need It?
One of my secrets to saving so much money is I automate my savings. The Personal Finance Binder has an Automatic Savings Tracker to help you with this. This worksheet will help you track all of your automatic savings so you’re more organized.
You will know exactly:
- When your automatic savings is scheduled to be transferred;
- What account your savings is coming from;
- What account your savings is going to;
- How much money you will be automatically saving; and
- The total you have saved so far under the “Balance” column
Use the Automatic Savings Tracker worksheet to make sure you have enough money in your various accounts for when your savings will be automatically transferred.
I recommend automatically transferring money directly to savings as soon as you’re paid. This way you won’t get a chance to spend it before you save.

A few of my other favorite printables that help me save more money in the Personal Finance Binder are the:
- Savings Tracker
- Savings/Debt Thermometer
- 31-Day Money Savings Challenge
- 52-Week Money Savings Challenge
- No Spend Challenge Calendar
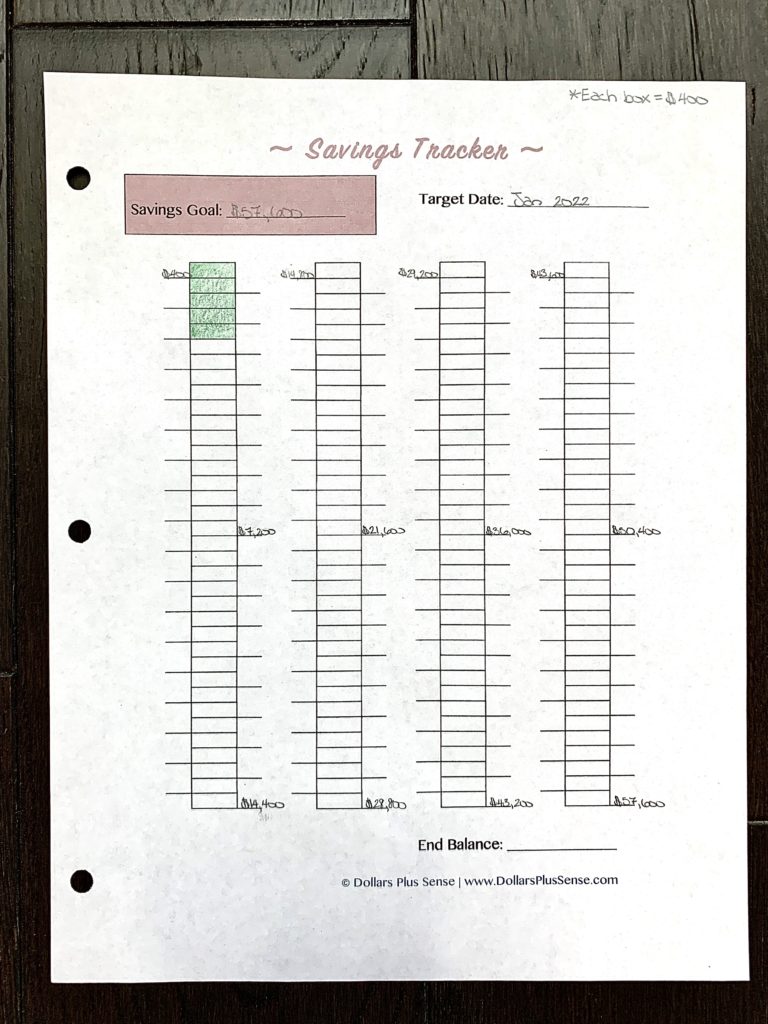
The Savings Tracker and Savings/Debt Thermometer is a fun visual to view your progress. I don’t know if you’re like me, but coloring in each box keeps me motivated to keep going because I can actually see the progress I’m making.
Some months I like to use the 31-Day Money Savings Challenge because it’s a fun way to save almost $500 in one month. If you take the 52-Week Money Savings Challenge, you will save $1,378 by the end of the year.
Finally, if you’ve overspent some months and want to cut back on expenses and save money, you can take the No Spend Challenge. This challenge is a fun way to cut back on any spending on non-essential items for the month.
Section 5: Other/Planning
The last section of my budget binder is where I focus on any seasonal planning I need to do or other miscellaneous financial business. In this section I keep the following printables:
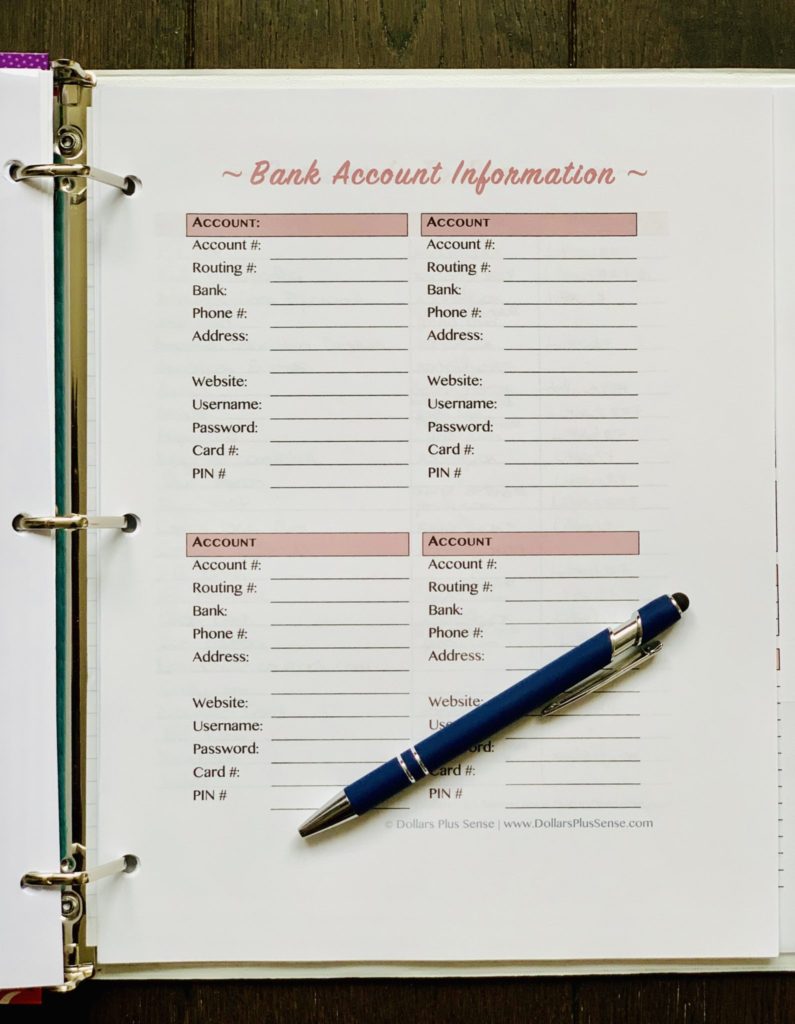
- Bank Account Information
- Passwords To Remember
- Donations Tracker
- Tax Deductions Tracker
- Black Friday/Cyber Monday Shopping Plan
- Christmas Shopping Plan
- Weekly Meal Planner
- Holiday Meal Planner
I like to keep the planners that I don’t refer to as often as the others in the last section of my binder.
However, a few of my favorite printables in this section are:
- Black Friday/Cyber Monday Shopping Plan
- Christmas Shopping Plan
- Holiday Meal Planner
- Weekly Meal Planner
The Black Friday/Cyber Monday Shopping Plan will help you make a shopping plan to make sure your holiday shopping is a success and you get the best Black Friday deals.
The Christmas Shopping Planner has the same concept. It’s designed to keep you organized and help you prepare for Christmas.
The Holiday Meal Planner is designed to make it simple for you to plan all your menu items during different holidays (such as Thanksgiving, Christmas, Easter, 4th of July, etc.).
I also made it easy to compose a shopping list and write down how much each item will cost so you can stick to your holiday meal budget.
Furthermore, I included a food inventory list for you so you can see what items you already have. This will make sure you don’t buy anything you don’t need by accident.
Last, my favorite printable in this section is the Weekly Meal Planner. Most of us struggle with sticking to our food budget, so this printable is designed to help you plan all your meals for the week and save money on groceries every month.
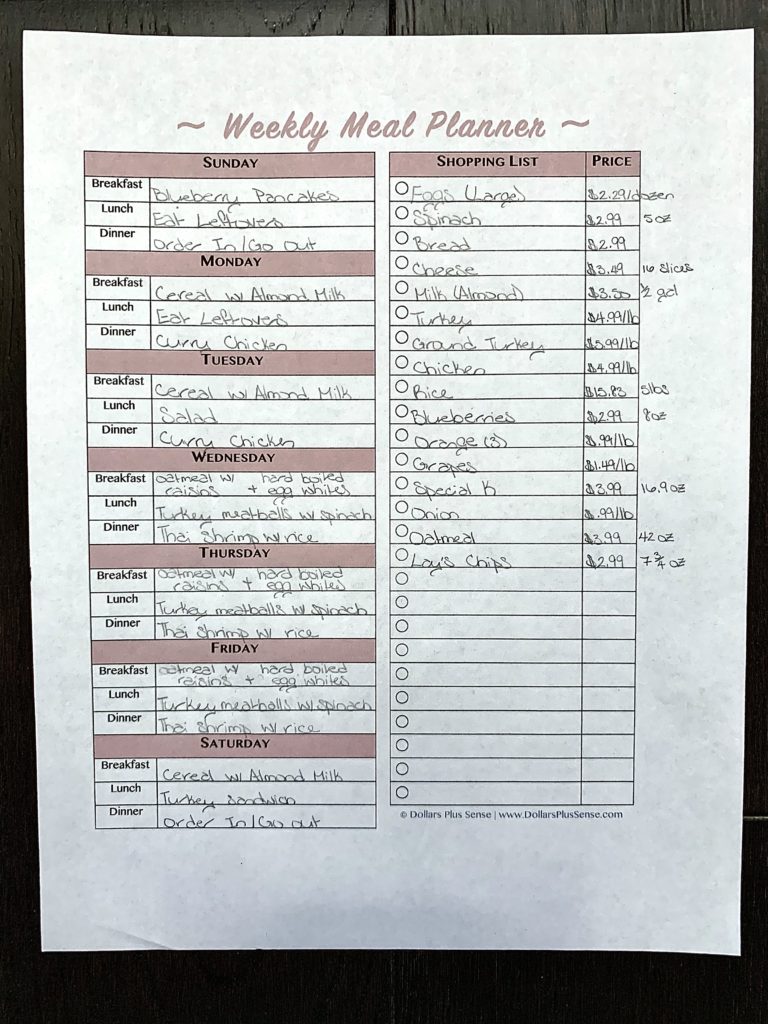
It makes it easier for you to make a shopping list and write down how much each item will cost. This will allow you to make sure you’re not overspending before you get to the store.
It also gives you a general idea of what your grocery bill should be at checkout. Therefore, if you see a big difference in your bill (and you stuck to your shopping list) you know to check your receipt to make sure you weren’t double charged or overcharged for something by accident.
Finally, the food inventory list will help you see what items you already have so you don’t buy anything you don’t need by accident.
How I Set Up My Personal Finance Binder
When first setting up my Personal Finance Binder, I printed out all the pages at once. At the beginning of a new month, I print any extra budget sheets, trackers, planners, or calendars I may need.
The monthly pages I regularly print for my budget binder are:
- Monthly Financial Goals
- Bill Payment Calendar
- Monthly Financial Goals Reflection
- Habits Tracker
- Monthly Budget
- Cash Envelopes Template and Tracker
- Cash Envelope Overview
- Income Tracker
- Daily Expense Tracker
These sheets help me organize my budget and plan out my goals for each month. If you want to learn more about setting up your Personal Finance Binder read my article “How To Create A Personal Finance Binder: Supplies List.”
Benefits Of A Printable Budget Planner
I think a printable budget planner is a great way to organize your finances and get control of your money. The Personal Finance Binder will help you:
- Stay organized;
- Pay off debt;
- Save money.
- Set financial goals;
- Budget your money;
- Track your income; and
- Change the way you think about money so you can have more money.
This binder is everything you need to manage your money better, and that’s the first step on your financial journey.
What’s Included In The Personal Finance Binder
This binder is a digital download of over 55 pages worth of printables. Here’s what’s included:
- Cover Page
- Table of Content
- About Me
- Money Mindset Assessment
- Net Worth Worksheet
- Financial Goals
- Yearly Financial Goals
- Monthly Financial Goals
- Weekly Financial Goals
- Bill Payment Calendar
- Weekly Planner
- Daily Planner
- Monthly Financial Goals Reflection
- Habits Tracker
- Bank Account Information
- Passwords To Remember
- Monthly Budget (Filled)
- Monthly Budget (Unfilled)
- Paycheck Budgeting
- Cash Envelope Templates and Spending Tracker Insert
- Cash Envelope Overview
- Budget Categories Checklist
- Income Tracker
- Annual Expense Tracker (Filled)
- Annual Expense Tracker (Unfilled)
- Annual Bill Payment Checklist
- Daily Expense Tracker
- Upcoming Expenses Tracker
- Automatic Bill Payment Tracker
- Bill Payment Tracker
- Debt Avalanche/Snowball Worksheet
- Debt Payment Tracker
- Debt Worksheet
- Automatic Savings Tracker
- Savings Tracker
- Debt/Savings Thermometer
- Sinking Fund Worksheet
- 31 Day Savings Challenge
- 52 Week Money Savings Challenge
- No Spend Challenge
- Yearly Financial Goals Reflection
- Stock Investments Tracker
- Donations Tracker
- Tax Deductions
- Birthday Gift/Special Day Planner
- Black Friday Planner
- Christmas Shopping Planner
- Weekly Meal Planner
- Holiday Meal Planner
It also comes with a user guide that explains exactly how to use every printable that comes in this binder. You can mix and match the pages to make the binder perfect for you. If you happen to find a page that does not work for your situation, just remove it from your binder.
Summary
I use my Personal Finance Binder for budget organization. A finance or budget binder is perfect for you if you have a hard time organizing your finances; you’re tired of stressing about money; or you just don’t know where to start on your financial journey.
So start using this system to budget my money and make a plan for your financial future.
You can grab a copy of the Personal Finance Binder HERE.
Related Articles:
- How To Use A Monthly And Yearly Household Budget Spreadsheet
- How I Saved $300,000 In 4 Years
- How Being A Penny Pincher Is Costing You
If you want to remember this article, pin it to your favorite Pinterest board.

I just wanted to let you know that I loved reading your story. You’ve been through a great deal but I admire your dedication to your dreams. I look forward to learning about all the wealth building tips that I can keep in my back pocket for when we are finally out of debt.
Thanks Ozella! You can do it…and I can’t wait to celebrate with you when you’re out of debt! 🙂
Hi Dafina.
I just love your site! This article in particular.
Now I have been wondering for the past week:
Your annual expense tracker…
I’m really inspired by it, but I’m not sure I get it entirely.
An example.
In dining out you write -70 (January), -30 (February), +52 (March), +4 (April)
Let’s take February. Does that mean you spent 30 dollars too much on dining out (compared to your months’ budget) or is it referring to a total balance?
I really hope you feel like explaining because I believe this sort of tracker could be very helpful to me.
Greetings from Denmark
//Signe Marie
Hi Singne. Thanks so much…I’m glad I was able to inspire you! As for the annual expense tracker…the way I use it is the -30 that you see in February for dining out refers to that month’s budget. However, you can certainly do a total balance method if you choose :). The good thing about budgeting is you can use whatever method that works best for you. What I personally do is adjust my monthly budget. So let’s say I normally give myself $100/month to spend on dining out, and I overspend by $30 in February, I may adjust my monthly budget in March to only give myself $70 to spend on dining out…or keep my dining out budget at $100 and cut back somewhere else. So you can also try that method as well.